How to organise a face to face regional training day
- contact the SWOT Education team ([email protected]) and fill in a RTD proposal form and COVID risk assessment
- once your RTD is approved, trainees will be able to register for your RTD (ideally we want registration to open at least 6-8 weeks before the event, to allow for study leave application)
- a week before your RTD, the SWOT Education team will contact you with the register of all trainees attending and provide you with email addresses, if you wish to contact them with pre-course work or event timetable
- after you RTD, please email the SWOT Education team ASAP with the register of all those who attended, so that feedback and certificates can be organised
How to organise a virtual regional training day
Due to funding issues for Zoom, we are now moving over to running all of our virtual study days from January 2022 onward on Microsoft Teams. This will allow the trainees running the days to be able to create and edit their own events, and not rely on being let into the meeting and made host by one of the Education Reps. Here is some guidance which will hopefully help you set up and run your day:
1) Planning the RTD
- contact the SWOT Education team ([email protected]) and fill in a virtual RTD proposal form
2) Scheduling the RTD on Teams
-Go to ‘Calendar’ on the left hand side bar and select ‘New Meeting’ in the top right hand corner
-Select the range of time in the calendar which corresponds with the approved RTD
-Here you can add the title of the RTD and add details of the event
-When you first schedule the meeting it is optional whether to add attendees or not
-If you create the meeting more than a week in advance of the RTD, we would suggest you do not add attendees at this point
-One week prior to the RTD you will receive confirmation from the SWOT Education team about who is booked onto your event, and if you schedule the meeting at this point you can then add all of the trainees’ email addresses to invite them to the virtual RTD
-Once you have filled out all of your details (with or without attendees), clinic ‘Save’ (if no attendees yet) or ‘Send’ (if trainees’ emails have been added) at the top right hand corner to create the virtual event
3) Editing the RTD on Teams/Adding attendees
-You will be able to find the event in your calendar (accessed in the left hand side bar as before)
-Once you have found the event on the corresponding date, right click on the name and click ‘edit’
-This will bring you to the event details where you can now add the email addresses of the trainees and click ‘send update’ at the top right to send out the invitation
4) Running the RTD on Teams
-On the day of the RTD, find your event by selecting ‘Calendar’ on the left hand side bar
-You should now see a video camera icon to start the meeting
-You will be given options of audio and video, once finalised, click ‘Join now’
-To share your screen during the meeting, select ‘Share content’ on the right of the bar at the top (next to ‘Leave meeting’). Then choose to present your entire screen, a window or a Powerpoint file
-If you’re using Teams on the web, you’ll be able to share your screen only if you’re using Google Chrome or the latest version of Microsoft Edge
-If you’re using a Mac, you’ll need to grant permission to Teams to record your computer’s screen before you can share your screen
Due to funding issues for Zoom, we are now moving over to running all of our virtual study days from January 2022 onward on Microsoft Teams. This will allow the trainees running the days to be able to create and edit their own events, and not rely on being let into the meeting and made host by one of the Education Reps. Here is some guidance which will hopefully help you set up and run your day:
1) Planning the RTD
- contact the SWOT Education team ([email protected]) and fill in a virtual RTD proposal form
2) Scheduling the RTD on Teams
-Go to ‘Calendar’ on the left hand side bar and select ‘New Meeting’ in the top right hand corner
-Select the range of time in the calendar which corresponds with the approved RTD
-Here you can add the title of the RTD and add details of the event
-When you first schedule the meeting it is optional whether to add attendees or not
-If you create the meeting more than a week in advance of the RTD, we would suggest you do not add attendees at this point
-One week prior to the RTD you will receive confirmation from the SWOT Education team about who is booked onto your event, and if you schedule the meeting at this point you can then add all of the trainees’ email addresses to invite them to the virtual RTD
-Once you have filled out all of your details (with or without attendees), clinic ‘Save’ (if no attendees yet) or ‘Send’ (if trainees’ emails have been added) at the top right hand corner to create the virtual event
3) Editing the RTD on Teams/Adding attendees
-You will be able to find the event in your calendar (accessed in the left hand side bar as before)
-Once you have found the event on the corresponding date, right click on the name and click ‘edit’
-This will bring you to the event details where you can now add the email addresses of the trainees and click ‘send update’ at the top right to send out the invitation
4) Running the RTD on Teams
-On the day of the RTD, find your event by selecting ‘Calendar’ on the left hand side bar
-You should now see a video camera icon to start the meeting
-You will be given options of audio and video, once finalised, click ‘Join now’
-To share your screen during the meeting, select ‘Share content’ on the right of the bar at the top (next to ‘Leave meeting’). Then choose to present your entire screen, a window or a Powerpoint file
-If you’re using Teams on the web, you’ll be able to share your screen only if you’re using Google Chrome or the latest version of Microsoft Edge
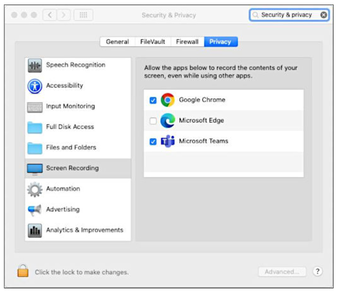
-If you’re using a Mac, you’ll need to grant permission to Teams to record your computer’s screen before you can share your screen
- You’ll be prompted to grant permission the first time you try to share your screen. Select ‘Open System Preferences’ from the prompt
- Under ‘Screen Recording’, make sure Microsoft Teams is selected
-To give control to another meeting participant during the meeting, select ‘Give control’ on the . Select the name of the person you want to give control to. To take control back select ‘Take back control’
-To record a meeting, go to the ‘More actions’ in the top bar (three dots) and select ‘Start recording’ in the drop down options. This will also start an automatic live transcription – you can stop this in the same drop down list of actions – the recording will continue until you stop it using the same controls
-The recorded meeting will then appear in the meeting chat. Click on it in to open in your browser. In the top panel you will then be given options of sharing or downloading the recording, copying the link.
-Alternatively, the recorded meeting will be saved automatically to your OneDrive, in a “Recording” folder. To access OneDrive, log in to Office 365 and choose OneDrive icon (cloud) from the Menu on left hand side.
-Please email the link for the recording to [email protected]
